
Step-by-Step Guide to Contouring for Beginners
Contouring has become an essential part of modern makeup routines, especially with the latest bridal makeup trends emphasizing sculpted and defined facial features. If you’re just starting your makeup journey, this Step-by-Step Contouring Guide for Beginners will help you master the basics. From choosing the right products to applying contour with precision, this Step-by-Step Contouring Guide for Beginners ensures you get professional-looking results at home. Whether you want to enhance your bridal look or everyday glam, following this Step-by-Step Contouring Guide for Beginners will give you the confidence to create a beautifully contoured face.
Why Contouring is Essential in Bridal Makeup
With wedding photography capturing every detail, having a perfectly contoured face ensures that a bride’s best features are highlighted. The latest bridal makeup trends favor soft, natural contouring that enhances bone structure without looking too harsh. Proper contouring can:
- Define cheekbones, jawline, and nose
- Add depth and dimension to the face
- Enhance facial symmetry
- Complement different lighting conditions
Now, let’s dive into the step-by-step process to achieve a perfectly contoured look.
Step 1: Gather Your Contouring Essentials
Before you begin, make sure you have the right products and tools:
1. Contour Products
Choose between cream, powder, or stick contouring products based on your skin type:
- Cream Contour: Best for dry skin; blends seamlessly for a natural look.
- Powder Contour: Ideal for oily skin; sets well and stays put throughout the day.
- Stick Contour: Easy to apply and blend, great for beginners.
2. Highlighter
A highlighter enhances the high points of the face, making them pop. Choose a shade slightly lighter than your skin tone.
3. Blending Tools
- Beauty sponge for seamless blending.
- Angled contour brush for precise application.
- Fan brush for soft highlighter application.
Step 2: Prep Your Skin
A well-prepared base ensures smooth and long-lasting contouring.
- Cleanse and moisturize to keep your skin hydrated.
- Apply primer to create a smooth base and extend the wear of your makeup.
- Use a foundation that matches your skin tone for an even canvas before contouring.
- Apply concealer under the eyes and on any blemishes to brighten and smooth the complexion.
Step 3: Identify Your Face Shape
Different face shapes require different contouring techniques. The latest bridal makeup trends focus on enhancing natural beauty rather than drastically altering features.
1. Oval Face
- Contour under the cheekbones and jawline.
- Highlight the center of the forehead, chin, and under the eyes.
2. Round Face
- Apply contour along the temples and jawline to create definition.
- Highlight the forehead and chin for a lengthening effect.
3. Square Face
- Contour the sides of the forehead and jawline to soften angles.
- Highlight the cheekbones to draw attention to the center of the face.
4. Heart-Shaped Face
- Contour the temples and jawline to balance the face.
- Highlight the chin and under-eye area.
5. Long Face
- Contour the forehead and chin to create the illusion of a shorter face.
- Highlight the cheekbones to add width.
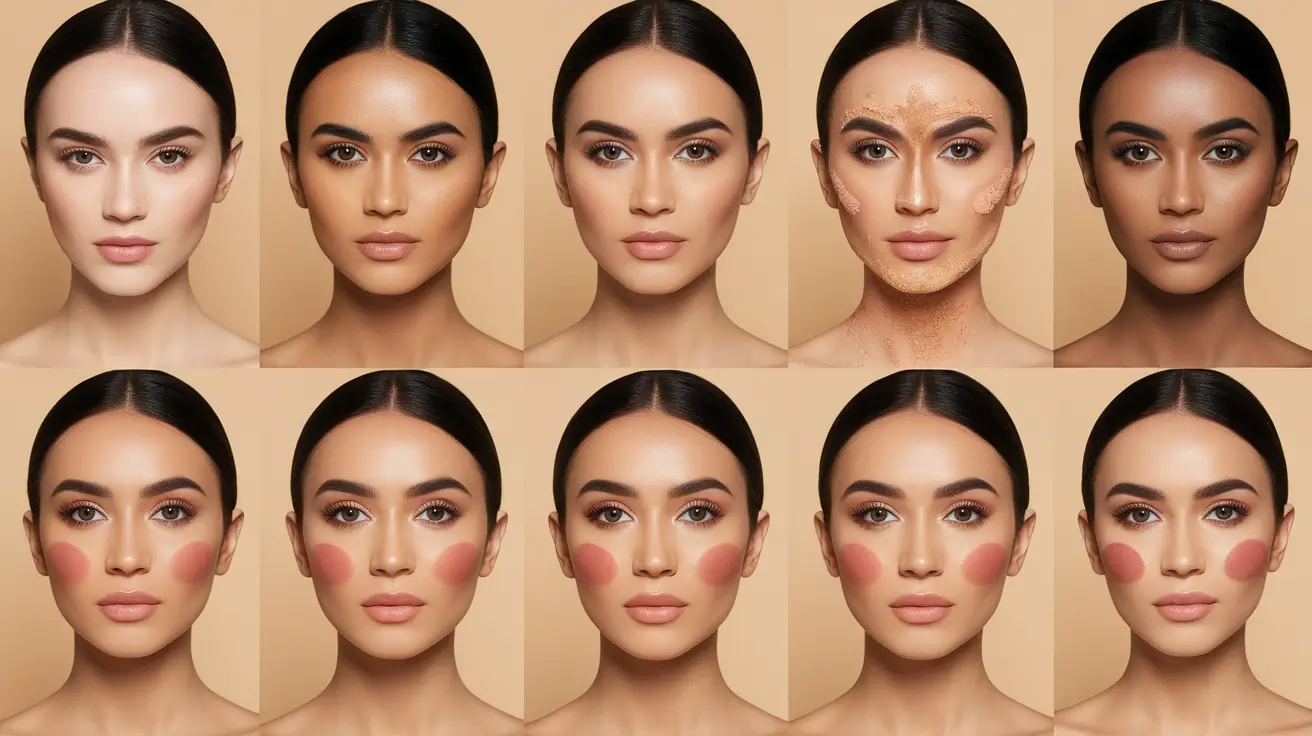
Step 4: Apply Contour
1. Cheekbones
- Suck in your cheeks and apply contour just below the cheekbones.
- Blend upwards towards the hairline for a lifted effect.
2. Jawline
- Apply contour along the jawline and blend downward to avoid harsh lines.
3. Forehead
- Apply contour near the hairline to create depth and balance a larger forehead.
4. Nose
- Draw two thin lines along the sides of the nose and blend well for a subtle slimming effect.
5. Chin
- If you want to shorten the chin, apply a small amount of contour at the bottom and blend.
Step 5: Apply Highlighter
Highlighter adds glow and enhances the natural high points of the face.
- Apply highlighter on the tops of the cheekbones.
- Dab a little on the bridge of the nose for a lifted look.
- Highlight the center of the forehead and cupid’s bow for a radiant effect.
- Blend well to ensure a seamless transition between the contour and highlight.
Step 6: Blend, Blend, Blend!
Blending is the key to achieving a natural contour. Use a damp beauty sponge or a fluffy brush to blend contour and highlighter seamlessly.
- Use circular motions for powder contour.
- Use stippling motions for cream contour.
- Avoid harsh lines by blending upwards and outwards.
Step 7: Set Your Contour
To ensure your contour stays in place throughout the day, especially for bridal makeup, setting is crucial.
- Use a translucent setting powder to lock in the highlight.
- Apply a light layer of bronzer over the contour to enhance depth.
- Finish with a setting spray to keep everything in place for long hours.
Pro Tips for a Flawless Contour
- Choose the Right Shade – The contour should be two shades darker than your foundation for a natural look.
- Build Gradually – Start with a light hand and add more product as needed.
- Blend Thoroughly – Harsh lines make contouring look unnatural. Take your time blending.
- Use Cream for a Natural Look – If you prefer a subtle finish, use cream contour and blend well.
- Follow the Light – Apply contour where shadows naturally fall and highlight where the light hits.
- Practice Makes Perfect – Don’t expect perfection on the first try! Keep practicing to master your technique.


MyName
bCeznl uvLf fPgPC BcuhJ pUD znzUwyvv