

Makeup That Looks Good on Camera and in Person
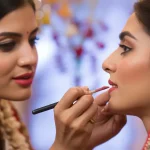
Every bride wants to look flawless on their wedding day. But here’s the catch—makeup that looks stunning in person can sometimes look flat, shiny, or overdone on camera. And what pops beautifully in photos may look heavy up close. That’s where the expertise of the best bridal makeup artist comes in.
They know how to strike that delicate balance between natural beauty and camera-ready perfection. In this blog, we’ll walk you through how to get makeup that works for both real life and high-resolution photography—because you deserve to look amazing in every moment.
Why Makeup Needs to Perform in Both Worlds
Your wedding day is filled with real-life moments and nonstop documentation. You’ll be smiling, crying, hugging, and dancing while also being photographed from every angle.
Here’s what you’re up against:
-
Cameras exaggerate shine and uneven texture
-
Flash can wash out color
-
Natural lighting and artificial lighting can change how makeup appears
That’s why the best bridal makeup artist creates a look that balances lighting, longevity, and facial definition.
Step-by-Step: Makeup That Works On and Off Camera
Step 1: Start with Skin That’s Smooth and Hydrated
You don’t need perfect skin—you need prepared skin. The best canvas starts with a well-hydrated, exfoliated face.
Pro Tips:
-
Use a gentle exfoliator the night before.
-
Apply a hydrating moisturizer or serum (like hyaluronic acid).
-
Avoid anything too greasy or heavy—it can cause foundation to slip under camera lights.
The best bridal makeup artist knows that camera-friendly makeup starts with healthy skin prep, not layers of product.
Step 2: Use the Right Primer
Primer helps smooth texture, minimize pores, and control shine. But not all primers work for both the eye and the lens.
Choose:
-
Mattifying primer on the T-zone
-
Hydrating primer on dry areas
-
Blurring primer to even out fine lines or texture
Avoid anything with a strong SPF or flashback-causing ingredients (like silica) on the wedding day. The best bridal makeup artist always checks for flashback under camera flash.
Step 3: Foundation That Doesn’t Look Like Foundation
You want coverage—but not caked-on, mask-like coverage.
Go for:
-
Medium to full coverage foundations that are buildable
-
Natural or satin finishes that mimic skin
-
Formulas without SPF, which can cause flashback
Use a damp beauty sponge to press foundation into the skin. It avoids streaks and blends better under lighting.
The best bridal makeup artist customizes foundation blends to match the bride’s undertone and lighting conditions of the venue.
Step 4: Conceal Strategically
Use concealer where needed—under the eyes, around the nose, and over any blemishes. But don’t overdo it.
On Camera:
-
Use a concealer just one shade lighter than your foundation for brightening.
-
Avoid extremely light under-eye concealer—it can look ghostly in flash photos.
The best bridal makeup artist blends concealer seamlessly and sets it lightly with powder to avoid creasing.
Step 5: Set It, But Don’t Over-Powder
Powder is essential to lock in makeup and control shine, but too much can look dry and flat—especially in HD.
Tips:
-
Set oily areas only (like the forehead, nose, and chin).
-
Use translucent loose powder with a puff or soft brush.
-
Avoid piling on powder under the eyes.
The best bridal makeup artist taps powder into the skin rather than sweeping, which keeps the glow and blurs without buildup.
Contour and Highlight That Reads in Real Life and Photos
Step 6: Define Your Face—Softly
Contouring is key to making your features pop on camera, but it must be blended to perfection in person.
Use:
-
Cream or powder contour for cheekbones, jawline, and temples
-
Warm tones, not gray (gray reads as muddy)
-
Light-handed application, then blend until seamless
The best bridal makeup artist focuses on soft, buildable definition rather than sharp lines that only work on Instagram.
Step 7: Highlight for a Healthy Glow
Use a satin or soft shimmer highlighter—not glittery or frosty.
Apply to:
-
Tops of cheekbones
-
Inner eye corners
-
Cupid’s bow
-
Brow bone (lightly)
Avoid placing highlighter on textured or acne-prone areas. The best bridal makeup artist knows less is more with light-reflective products on camera.
Blush, Brows, and Eyes That Balance Both Worlds
Step 8: Blush Adds Life
Blush is essential—it brings color back to your face under harsh lighting.
Pick:
-
A natural tone that mimics a real flush
-
Cream blush for dry skin, powder for oily skin
-
A little extra than you think—cameras wash out color
The best bridal makeup artist blends blush into the contour for a lifted look that looks natural yet defined.
Step 9: Frame the Eyes and Brows
The eyes are the focal point in both photos and real life.
For Eyes:
-
Use matte shades in the crease for definition
-
Add shimmer only on the lids or inner corners
-
Avoid heavy black shadow or liner unless you’re going full glam
For Brows:
-
Define them to frame the face
-
Stick to your natural shape
-
Use powder or pencil—not just gel—for long-lasting shape
Brows should look structured but never overdrawn. The best bridal makeup artist knows when to stop.
Step 10: Lashes Matter
Lashes open up the eyes in photos—but they shouldn’t overshadow your face.
Use:
-
Natural or wispy strip lashes
-
Individual lashes for soft glam
-
Lash extensions if you want longevity
The best bridal makeup artist applies lashes that enhance your natural shape—not just trendy styles.
Step 11: Lips That Last and Look Great in Every Shot
Your lip color should match your overall tone and be touch-up friendly.
Choose:
-
A long-wearing but hydrating formula
-
A natural, pinky-nude or soft berry that complements your undertone
-
A lip liner to prevent feathering
Skip super matte formulas if you have dry lips—they crack under close-up shots. The best bridal makeup artist preps lips with balm and exfoliation beforehand.
Final Touch: Lock It All In
Use a makeup setting spray to blend powders together and help the look last all day and night. This makes makeup look more skin-like—on camera and in person.


Leave a Reply